Quick Information: This post assumes that your core Laravel application is already working, has reverb package already installed and being served on a domain. We will configure Nginx, create a systemd service to start Reverb, and set the correct environment variables to ensure Reverb works properly.
So you’ve built that amazing real-time chat feature with Laravel Reverb, and it’s working beautifully on your local machine. Users are connecting, messages are flying back and forth, and everything feels snappy and responsive. But now comes the moment every developer dreads: deploying WebSockets to production.
I’ve been there. After spending weeks perfecting a real-time chat system locally, I confidently pushed it to the production server—only to watch the real-time features fail and the frontend flood the console with WebSocket connection errors. WebSocket connections were dropping, SSL handshakes were failing, and my beautiful real-time app became a very expensive paperweight.
If you’re reading this, you’re probably in the same boat. Don’t worry – I’ve learned from those painful mistakes, and I’m going to walk you through exactly how to deploy Laravel Reverb to production without losing your sanity (or your users).
Reverb Server Deployment Steps
There are only three steps involved in starting the Reverb server on your VPS alongside your Laravel application. We assume that Reverb and all necessary packages (including the core broadcasting package) are already installed in your Laravel application. First, we configure the environment variables such as keys and ports. Then, we start the Reverb server using Linux’s systemd to keep it running in the background. Finally, we configure the Nginx file to serve the application on your domain for use in your web applications.
Step #01 – Environment Variables
You need to create or update the following variables in your Laravel application’s .env file. By default, the Reverb installation adds a few variables, but they are not sufficient for production deployment, so we must manually define them.
The credentials should be defined exactly as shown in the image below. Set BROADCAST_CONNECTION to reverb so your app use reverb instead of PusherJS to file e.t.c. Ensure that the random string values, REVERB_APP_KEY & REVERB_APP_SECRET, are unique and do not match each other. Keep them private and do not share them. The REVERB_HOST value should match your actual Laravel application’s domain, but it must not include https://—keep it simple (e.g., example.com).
You can change the port if the default one is already in use. This port will be referenced in the systemd and Nginx configuration files in the following steps, so make sure to remember it.
If you make any changes to these values in the future, be sure to rebuild your project using the npm run build command otherwise new configurations will not work.

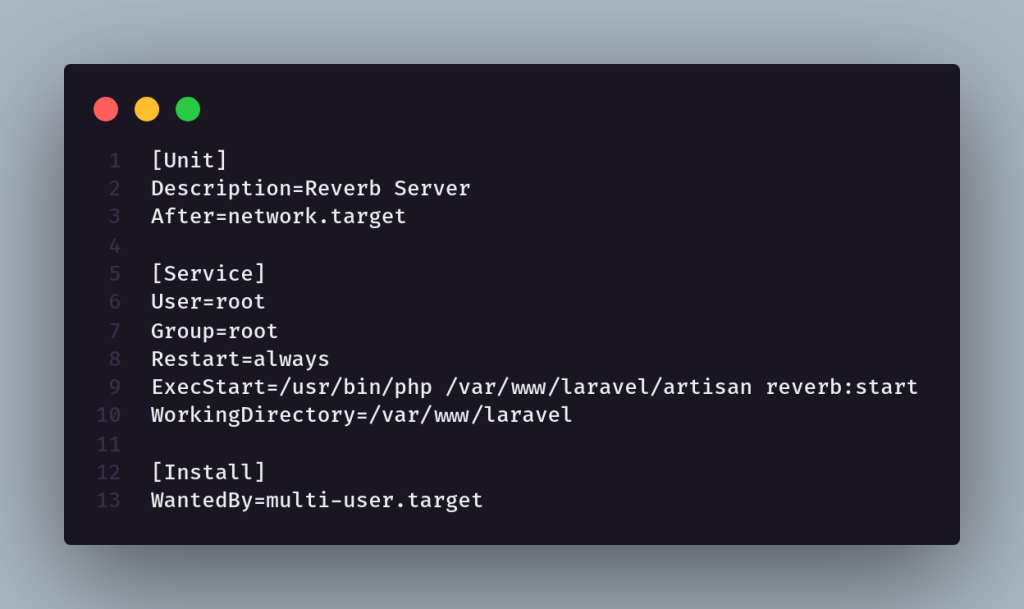
Step #02 – Systemd Background Service
In this step, we will create a systemd service on Linux to run the Reverb server. This is a background service that starts and keeps the Reverb server running. In case the server crashes or your VPS restarts, the Reverb server will automatically come back online during the reboot process, ensuring zero downtime in production.
I’ve named my systemd service reverb-server.service, but you can choose any name you prefer.
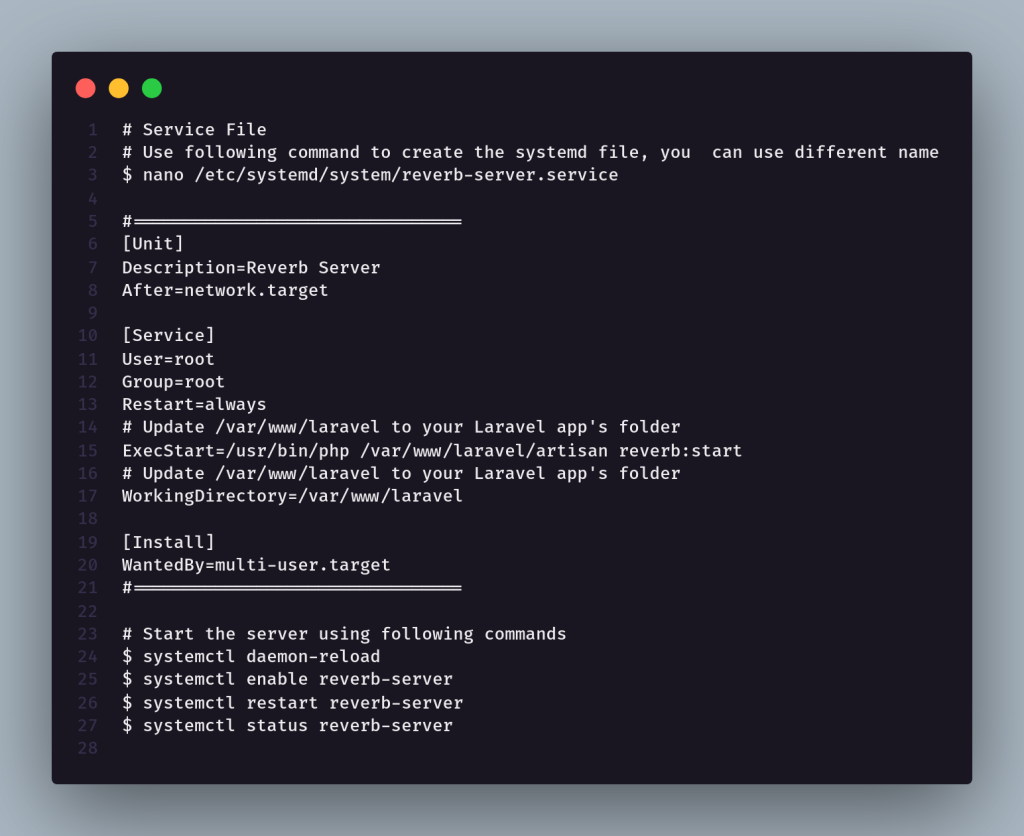
You need to create this systemd file in the /etc/systemd/system directory. In the example below, I’ve used /var/www/laravel as the Laravel application path—make sure to update it with the correct path to your own Laravel application. Update this path in both the ExecStart and WorkingDirectory options.
The User and Group can be set to www-data since we’re using Nginx. However, if Reverb doesn’t start properly under www-data, you can change it to root as a fallback.
Here is what the systemd service file should look like:
Once you have configured the systemd file, you need to reload the systemd daemon, then enable and start (or restart) the service. You can check the status of your systemd service to ensure it is running correctly using the systemctl status reverb-server command. following image contains all systemd commands you will need for the service.
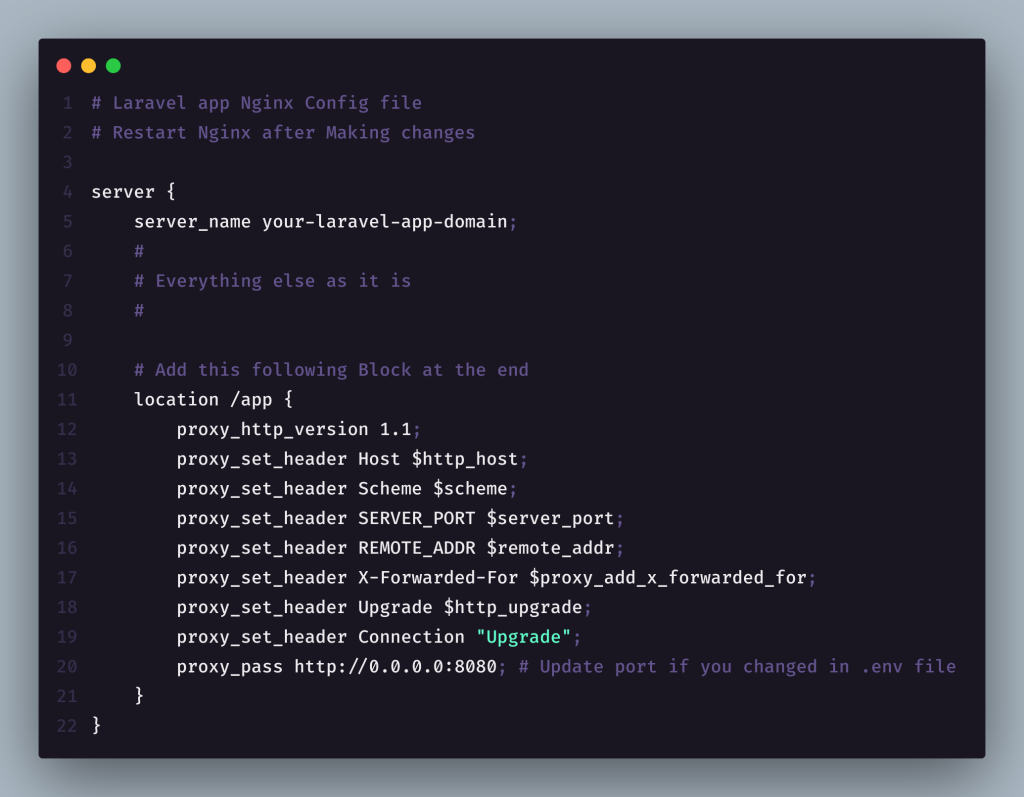
Step #03 – Nginx Configuration
Finally, we need to configure the Nginx config file to make Reverb work on the same domain as your Laravel app. Note that it’s also possible to deploy Reverb on a different domain or server and share it across multiple Laravel applications. However, in that case, you must provide the Reverb server credentials in the .env file of each Laravel app.
In our case, we are aiming for a monolithic architecture—keeping everything on a single server and domain, if it makes sense for your setup.
To proceed, open your existing Laravel app’s Nginx configuration file, usually located in /etc/nginx/sites-available/. This file contains the domain name of your Laravel app.
You’ll need to add the location /app { ... } block for Reverb at the end of the relevant server { ... } block. Be careful—if you’re using Certbot for SSL, it often creates an additional server { ... } block at the end of the file. Make sure you paste the Reverb block into the correct server { ... } section—the one that contains the server_name for your Laravel app.
Also, make sure the port number in the Reverb block matches the one you set in your Laravel app’s .env file and in the systemd service. Once everything looks correct, save the file and restart Nginx.
If you’re using Laravel Octane, don’t forget to restart it as well. If all configurations are set up properly, your application should run without issues.